
Tkinter
Introduction
The foundational element of a Tkinter GUI is the window. Windows are the containers in which all other GUI elements live. These other GUI elements, such as text boxes, labels, and buttons, are known as widgets.
window
The first thing you need to do is import the Python GUI Tkinter module:
1 | import tkinter as tk |
A window is an instance of Tkinter’s Tk class. Go ahead and create a new window and assign it to the variable window:
1 | window = tk.Tk() |
widgets
Use the tk.Label class to add some text to a window. Create a Label widget with the text "Hello, Tkinter" and assign it to a variable called greeting:
1 | greeting = tk.Label(text="Hello, Tkinter") |
The window you created earlier doesn’t change. You just created a Label widget, but you haven’t added it to the window yet. There are several ways to add widgets to a window. Right now, you can use the Label widget’s .pack() method:
1 | greeting.pack() |
window.mainloop() tells Python to run the Tkinter event loop. This method listens for events, such as button clicks or keypresses, and blocks any code that comes after it from running until you close the window where you called the method.
1 | window.mainloop() |
Working With Widgets
Each widget in Tkinter is defined by a class.
| Widget Class | Description |
|---|---|
Label |
A widget used to display text on the screen |
Button |
A button that can contain text and can perform an action when clicked |
Entry |
A text entry widget that allows only a single line of text |
Text |
A text entry widget that allows multiline text entry |
Frame |
A rectangular region used to group related widgets or provide padding between widgets |
Label Widgets
Label widgets are used to display text or images. The text displayed by a Label widget can’t be edited by the user.
Button Widgets
1 | button = tk.Button( |
Entry Widgets
It’ll display a small text box that the user can type some text into.
There are three main operations that you can perform with Entry widgets:
- Retrieving text with
.get() - Deleting text with
.delete() - Inserting text with
.insert()
Getting Multiline User Input With Text Widgets
Assigning Widgets to Frames With Frame Widgets
The following script creates a blank Frame widget and assigns it to the main application window:
1 | import tkinter as tk |
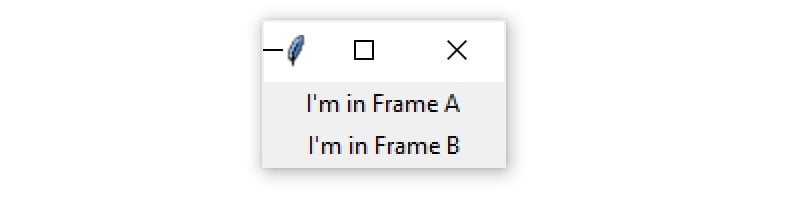
An empty Frame widget is practically invisible. Frames are best thought of as containers for other widgets. You can assign a widget to a frame by setting the widget’s master attribute:
1 | import tkinter as tk |
Now see what happens when you swap the order of frame_a.pack() and frame_b.pack():
1 | # Swap the order of `frame_a` and `frame_b` |

Now label_b is on top. Since label_b is assigned to frame_b, it moves to wherever frame_b is positioned.
Making Your Applications Interactive
In this section, you’ll learn how to bring your applications to life by performing actions whenever certain events occur.
Using Events and Event Handlers
When you create a Tkinter application, you must call window.mainloop() to start the event loop. During the event loop, your application checks if an event has occurred. If so, then it’ll execute some code in response.
Using .bind()
To call an event handler whenever an event occurs on a widget, use .bind(). The event handler is said to be bound to the event because it’s called every time the event occurs.
1 | import tkinter as tk |
Here, the handle_keypress() event handler is bound to a "<Key>" event using window.bind(). Whenever a key is pressed while the application is running, your program will print the character of the key pressed.
.bind() always takes at least two arguments:
- An event that’s represented by a string of the form
"<event_name>", whereevent_namecan be any of Tkinter’s events - An event handler that’s the name of the function to be called whenever the event occurs
Using command
Every Button widget has a command attribute that you can assign to a function. Whenever the button is pressed, the function is executed.
1 | import tkinter as tk |
Label widgets don’t have .get() like Entry and Text widgets do. However, you can retrieve the text from the label by accessing the text attribute with a dictionary-style subscript notation:
1 | def increase(): |
So we create two functions to increase or decrease the number when the “-“ button or “+” button is clicked.
Controlling Layout With Geometry Managers
Application layout in Tkinter is controlled with geometry managers. While .pack() is an example of a geometry manager, it isn’t the only one. Tkinter has two others:
.place().grid()
The .pack() Geometry Manager
For a given widget, the packing algorithm has two primary steps:
- Compute a rectangular area called a parcel that’s just tall (or wide) enough to hold the widget and fills the remaining width (or height) in the window with blank space.
- Center the widget in the parcel unless a different location is specified.
.pack() is powerful, but it can be difficult to visualize. The best way to get a feel for .pack() is to look at some examples. See what happens when you .pack() three Label widgets into a Frame:
1 | import tkinter as tk |
.pack() places each Frame below the previous one by default, in the order that they’re assigned to the window:

There are three invisible parcels, each containing one of the three Frame widgets. Each parcel is as wide as the window and as tall as the Frame that it contains.
The .place() Geometry Manager
You can use .place() to control the precise location that a widget should occupy in a window or Frame. You must provide two keyword arguments, x and y, which specify the x- and y-coordinates for the top-left corner of the widget.
Both x and y are measured in pixels, not text units.
Keep in mind that the origin, where x and y are both 0, is the top-left corner of the Frame or window. So, you can think of the y argument of .place() as the number of pixels from the top of the window, and the x argument as the number of pixels from the left edge of the window.
Here’s an example of how the .place() geometry manager works:
The .grid() Geometry Manager
.grid() works by splitting a window or Frame into rows and columns. You specify the location of a widget by calling .grid() and passing the row and column indices to the row and column keyword arguments, respectively.
Both row and column indices start at 0, so a row index of 1 and a column index of 2 tells .grid() to place a widget in the third column of the second row.
Loading Images in Tkinter using PIL
Use this command to install PIL :
1 | pip install pillow |
1 | # loading Python Imaging Library |
The ImageTk module contains support to create and modify Tkinter BitmapImage and PhotoImage objects from PIL images